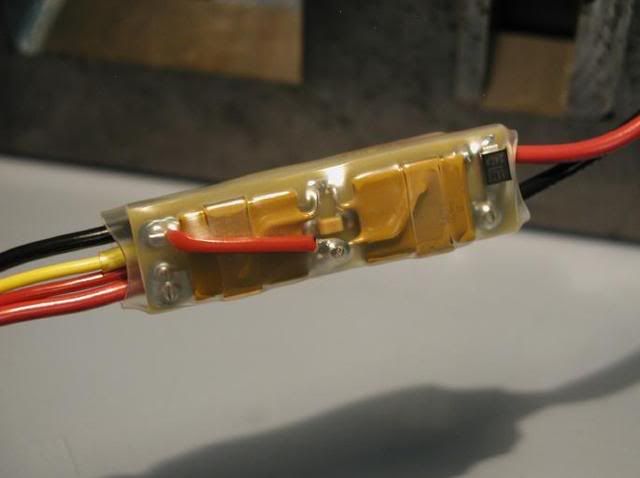
Recently someone asked me where/how I make the mosfets I use in my airsoft rifles. So I decided to share my "secret".
First of, definition on WTF is: Mosfet.
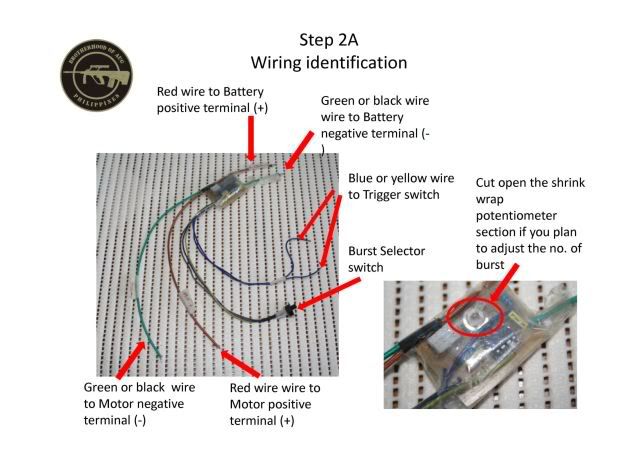
In airsoft terms it is a component that sits between your battery, trigger and motor. It reduces the current traveling through your contact plates of your trigger, extending the life of the trigger plates as well as increasing battery life, trigger response and ROF (rate of fire) [ever so slightly].
There are many different types of mosfets. Some do fancy things like burst fire and active breaking (with fancy micro controllers, wizardry and pixie dust) where as others just drop the current to the trigger.
Everything I've learnt, I learn't off the internet. Here are the different sites where I found the different types of DIY mosfets (in near future I'll do my own walk through of the making processes, but for now here are the web sites)
Simple Mosfet (just does the basic current drop to trigger)
Active breaking Mosfet (Does the basic current drop to trigger as well as some fancy foot work in terms of preventing over rotation of the motor/gears)
555 burst Mosfet (Uses a 555 timer chip to do burst fire and the usual current drop to the trigger)
Currently I'm trying to merge the last 2 types of mosfets are one (so, a 555 burst with active breaking). How that goes...I'll let you guys know when I've tested it.
A lot of people are against active breaking on airsoft aeg (automatic electric gun) as it adds extra tension on gears, motor and battery (seeing as it effectively send a reverse current to the motor to stop it from over rotating). I can definitely see their point, but some of my reading up has shown that if done softly/lightly it will not effect your gears/motor/battery.
In any case hope you guys enjoyed/learnt/at least read through this post, If you have any questions or requests I'll look into them and respond promtly.
Cheers
Hi. My name is Jacques Botha. 23 years of age, currently a B.Sc. Student at UCT (University of Cape Town, South Africa). This Blog is place where I can share my projects and interests with the www (World Wide Web). Here I'll share my sketches, digital and traditional. I'll also be sharing my 3D modelling and game dev projects. Finally any other project I'll partake in will also be shared.
Thursday 18 September 2014
Tuesday 2 September 2014
Tavor repaint project: Day 3
SOOOooooo...today was a more exciting day in the tavor repaint, you'll see later why.
I began again taping off everything that was not to become orange (leaving the previous tape on...cause that stays black)
Again, 2 light coats, this time Orange (still using Rust_oleum)
And finally, once dried, I removed all the tape (and here comes the exciting part). Boy am I pleasantly surprised at the results.
Next steps are cleanup, finer detail and finaly sealing it with a matte finish lacquer. After which I'll install a burst mosfet (I'll make a post about it later) and other electronics.
Anyhow, the next update should be the final one for the paint, so stay tuned to see this baby finished.
I began again taping off everything that was not to become orange (leaving the previous tape on...cause that stays black)
Again, 2 light coats, this time Orange (still using Rust_oleum)
And finally, once dried, I removed all the tape (and here comes the exciting part). Boy am I pleasantly surprised at the results.
 |
| The plan |
 |
| Current state |
Anyhow, the next update should be the final one for the paint, so stay tuned to see this baby finished.
Monday 1 September 2014
Tavor repaint project: Day 2
Soo...day 2 of the tavor build
Not much was done. Mainly stripped out all the internals and covered everything that was not to be painted with painters tape.
Sorry for the short up-date, not much to talk about in this step.
Not much was done. Mainly stripped out all the internals and covered everything that was not to be painted with painters tape.
I then gave the gun 2 light coats of Rust-oleum white (about 10 min per coat)
Next step will be to tape off anything that will not be orange and do those coats, and then finally some clean up, finer detail and a matte lacquer seal to finish the job.
Sorry for the short up-date, not much to talk about in this step.
Subscribe to:
Posts (Atom)
Trophy Project
So a family friend recently finished his 21th Cape Town Cycle Tour , which is quite the achievement. So I thought I'd make a trophy of s...

-
Admittedly there has not been an update for a while. Mostly due to finals happening so close after the hand in date and then me being on v...
-
So, I have this Propo XG6 (6 channel RC remote). Love the thing, does what I need and some. Any way, AA batteries here in South Afr...
-
So I recently acquired an Kinect for the sole porpoise of messing around with it (Mainly 3D scanning and live tracking + recording of human...


