Showing posts with label Blender. Show all posts

Thursday, 11 August 2016

My Varsity Final Project:Test level

So, as in all games we need a playable level.
Now this didn't need to be this completed but we wanted to give the Artist and the Musician a platform in which they can get a feel for what they will be working with.

I spent two days researching and prototyping level design and on the third day I pitched a "final" level to the team and they liked it. The level was done in Blender.

Note: the player controller is just the basic physics Unity FPV controller with the VR weapon...I needed something for the player to play with. How even...I do have a bit of a bug where if you run straight into the wall at high speed, there is a chance that you'd get stuck. An odd way to get out is turn to face the wall, walk back and fire the weapon.

Pictures:


Note: if you get stuck, and cant get free...just reload the page (the files should be buffered). Bad fix...but this is only a level demo. And yes, we know...getting stuck is frustrating.

So, that is the state of the level till thus far. Will do an update again on when I get the locomotion of the VR player down or the Artist/Musician delivers something.


Stage 2: VR prop                                                                                                                      Stage 4: Conclusion

Sunday, 14 February 2016

Tackling the good old "auto bed leveling" problem

Greetings all

So, I've been building the same 3d printer for 2 years now (A reprap morgan) and although frustrating, I'm loving every second of it.
Alongside my (unfinished 3D printer), I started building a variant of the rostock mini for a family member. I find the concept of auto bed leveling appealing...not necessary, but more of a nice to have imho.

Now, the usual way of bed leveling is that probe that gets engaged  by the belt and then it moves along the bed in the usual fashion,

There is alos a servo isk micro switch solotion like this

But more moving parts = more that can go wrong (imo)

Then I saw Steve Graber's video on YouTube, this concept stayed stuck in the back of my mind, but wasn't exactly what I wanted (the tilting looked a tad wonkey...and he didn't provide links to the files)

After a while I saw the concept of using Force Sensing Resistors on the bed of the printer for bed leveling, brilliant expect for the fact that you could not use a heated bed (as the head would affect the resistors)


Seeing that I want to be able to upgrade the printer in the future with a heated bed< and took a liking to the FSR concept I kept searching....and came across edlep's FSR Groove Mount for a hot end on Thingiverse link

Finally a solution that I really like...until I started trying to source some FSR's. So I'm from South Africa, and our currency is shot recently, these ended up as a non viable solution.
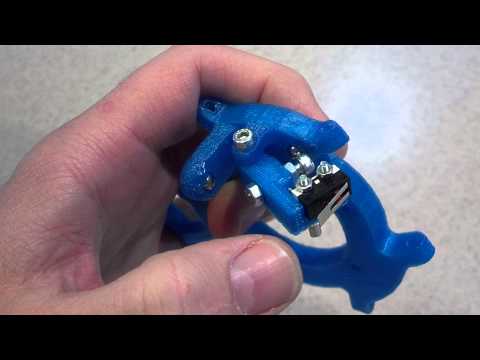
I did not give up how ever, remember Steve Graber's system I talked about earlier (having a micro switch attached to the hot end) now I thought that would be a great concept if combined with this...so I did a quick mockup.

Ladies and gent I present to you an alternative solution to an already solved problem.


Unfortunately, seeing as my printer is not done yet I cant show a working prototype yet, so if anyone is interested in giving this a go give me a shout and I'll upload the files.

Any C&C is welcome, as this is my first post here on the forums.

Tuesday, 27 January 2015

Global Game Jam 2015

Global Game Jam 2015

This past weekend I took part the annual Global Game Jam event.


  1. "A game jam is a gathering of game developers for the purpose of planning, designing, and creating one or more games within a short span of time, usually ranging between 24 and 72 hours. Gamedevelopers are generally made up of programmers, game designers, artists, and others in game development-related fields."
This years theme was: "What do we do now".

Diversifiers (Optional conditions):
  1. Noise Generator: The mechanic of the game is based on players having to stay in constant communication with each other.
  2. Folk: The game uses a folk or indigenous art style of your region.
  3. NES: Make the game playable on an old school console, either directly or through an emulator.
  4. Wrist Watcher: The game is playable on a smart-watch, or uses wearable technology in some way.
  5. Clueless Parents: The game helps kids teach something to their parents or other family members.
  6. Batch Job: The game is a batch file from any operating system, using command line tools found in an out of the box installation.
  7. Chimera: The game is played partly as a digital and partly as a non-digital (board, card, etc.) game. (we did this Diversifier
  8. Hyper-Local: The game is set in your town/city and contains elements locals can identify, while still being entertaining for a global audience.
  9. Can I Try?: Any spectator of the game automatically becomes a player as well.
  10. This is How it Feels: The game raises awareness of how hate speech or unfair accusations feel, and what kind of effect they have on their targets.
  11. Stephen Hawking Can Play This: In the game everything (including any menus) can be navigated with one button, without any need for quick / precisely timed presses.
  12. Eagle Ear: The game is primarily visual, but is also playable by visually impaired  players, either through audio design, or through a screenreader (VoiceOver, Talkback, JAWS etc).
  13. Relatively Speaking: A game based on the 100th anniversary of Einstein’s theory of general relativity, which explained that massive objects cause a distortion in space-time, such as light bending around black holes.
  14. Public Domain Class of 2015: Make a game based on the works entered to Public Domain on 1st January 2015 - for instance works of Wassily Kandinsky, Edvard Munch, Edith Sitwell, Piet Mondrian, Antoine de Saint-ExupĂ©ry, Felix Nussbaum, Filippo Tommaso Emilio Marinetti, Glenn Miller, Flannery O’Connor, and Ian Fleming (cough, James Bond, cough), depending on your country.
  15. Code for Good (Sponsored by Intel): Make a game with the goal of improving literacy, or inspiring interest in science, technology, engineering and mathematics (STEM) fields.
So when this jam started I was like, "I'm not going too code a single line of code. This year I'll be purely art-ing"....I ended up being the only coder in a team of 5.

Anyhow, it was tons of fun, this is what we made.


Augmented reality card game where players play cards to give their beasts weapons and actions. To start the game, each player chooses their character and takes the associated deck. Shuffle the deck and draw three cards each. Each card has an image, description of impact and the energy cost for the card. You cannot play a card if you do not have enough energy to play it. Decide which player will play first and place both creature cards onto the play mat. Player 1 selects one card from his or her hand and plays the card face up on the player mat card slot. The computer will calculate damage and reduce energy. It will then be Player 2's turn to play a card. The game continues until one beast has been reduced to zero health. Note: If a card indicates that you gain or lose defense percentage - this applies for the attack in the very next play of the opposing player. to use AR, ensure you have a decent webcam connect too the system that can see the cards.

GGJ link

The team
Jacques Botha (back middel) - Augmented Reality & Game coder, Project Manager, 3D modelling + rigging + animation, DJ
Ben Geldenhuys (back left) - 2D Art, Creative Metal Direction
Richard Ramsbottom (back right) - 3D modelling & rigging
Megan Hughes (front right) - Card game design
Adam Linder (front middel) - Music

Game screen shots 


Tech demo vid

Augmented tech: Vuforia

All in all it was fun, stressful, hard work and most importantly very very educational (even if we didn't stick to the theme). We as a team are contemplating on maybe continuing developing this game for a few months and see what the results turn out too be.


Sunday, 16 February 2014

The start of the project: G36

Soo...I recently decided I should start a project where I can up my modeling skills and build up a portfolio piece.

So what I'm doing i I'm recreating my ARES G36C airsoft rifle (everything).
My Gun ^^


So here is the first bit (front grip)

Model
Top

Front

Side

Angled

Turn table

So ya. There is still much to do.
Program: Blender (cycles)

Sunday, 26 January 2014

Global Game Jam 2014


So just finished my entry for the 2014 Global Game Jam
(More about GGJ "About GGJ")

Had fun. My team consisted of myself and a mate of mine (Conveniently named Jacques as well) and a guy called Deon.

The team:
From left: 
Deon van Heerden - Music
Jacques Heunis - Coder
Jacques Botha(Me) - Coder Artist and Sound FX

I participated at UCT (Cape Town, South Africa). This is how our location looked like.

The theme for this years jam is:

We don't see things as they are, we see them as we are"


Hmmm....this was rather tricky to approach. So we treated it as an source of inspiration rather than a guideline (ie. we took a short cut =P ). There where also side challenges that you can incorporate to add that extra zing (We did a no gender (as in the characters have no def. gender) and a local multi play (2+ people on 1 machine)

The idea we worked with is this. You are running along in parallel universes, trying to out run your parallel self opponent. All the obstacles you traverse (and the manner there of) affect you opponent (ie. Take the easy route, they get an easier obstacle. Take the harder route, harder obstacle awaits them). Ie. Things you do in your "world" does not affect you but rather you opponent. 

I was in command of art and sound, and helped with the coding. Other Jacques mainly focused on coding and  Deon did the back track for us. 

1 thing I can say about a jam like this, is little sleep and VERY high paced work.

Because our team is so small, we had to cover allot and where limited to what we can do.

But 42hours and 10 liters of coffee later, I present to you:


Sketch page:

Models (examples):

Finnally our game.
WASD - Player 1
Arrows - Player 2

Objective: Out run other player. Collect floating crates to make their lives harder
Web playerRapscallion Racing


A big thanks and well done to those who organized this awesome event,


Thursday, 26 December 2013

Kinect Mayhem (Kinect and Blender Marriage)


So I recently acquired an Kinect for the sole porpoise of messing around with it (Mainly 3D scanning and live tracking + recording of human movement for animations).

For those of you who don't know what a Kinect is...wow. For the past 3+ years in the console world it has been Xbox's response to the Wii motion Controller (like PS3's glow sticks/Move).
Image Ref:


Any how getting this thing to talk to my PC was a tad harder to do than I would've expected. But in short


But, after some trail and error I was able to at least get the Kinect and Human tracking up and running (3D scanning is still proving to be an formidable foe).


Essentailly what I tried to achive was a crude Mocap 

Here is a good example of mocap is in the recent game Beyond: Tow Souls

Essentially I had to install 
  1. OpenNi SDK
  2. Delicode NiMate
  3. Blender Plugin
  4. Blender
Once I got the basic up and running I made a quick mock up and ended up with this (I'll walk you through)

1) Download and install OpenNi SDK (preferably the 32bit, this is to prevent eorrors for a future 3D scan project[TBA]) and Delicode

2) Launch Delicode. (of course make sure kinect is connected and powered).

3) Go to Full Skeleton Tab (enable it). Change format from basic to basic + orientation. leave rest as is (the blender plugin handels the rest)

4) Go to OSC Controller Tab (enable it). Remember the port number (It shouldn't have to be changed...but just incase).

Example of it tracking a person
This concludes the Delicode segment, leave it running as we move on to blender.

5) Open Blender.

6) Next we will be installing the plugin. First go File->User Preferences
   Then go to Addon tab and select Install from File
   Go to where you saved the plugin, select and hit install

Note: When ever you the need to use this addon, go to User Preferences->Addons->Animation. Select and hit Enable


6) Now the fun starts. Clear the scene. Remember that port I told you to remember? Well in the left tab (at Ni mate reciver) the port numbers must correlate. Also tick the Add R check box and select empty from the button list. With this we are good to move on.
...but first hit start and stand in front of Kinect. Kablam!!!^^ You are now tracking body movement

7) Though a tad glitchy you can record basic movement and just tweak the tracking jump out. With this you can then add a skeleton to the scene that track to these points in space giving you a, well, skeleton to work of.
A brilliant tutorial on skeleton rigging in blender: Link

8)From here on it's up to you what you want to do with this. I'm planning on using this for basic human motion for games and short animations, but even just messing around with it is still quite fun.

Still todo:
  1. Fix ALL the driver clashes (there are still a few)
  2. get 3D scanning up and running
Thanks for your time.
Stay tuned for future projects and mishaps.
C&C's are always welcome.

Any requests on future projects or details of just drop the question, I'll do my best to respond/consider them ^^.

Trophy Project

So a family friend recently finished his 21th Cape Town Cycle Tour , which is quite the achievement. So I thought I'd make a trophy of s...